You're usually reading a guide like this for one reason. A browser is showing Not Secure, a client wants the padlock fixed today, or a renewal went sideways and nobody noticed until users started complaining.
Installing an SSL certificate isn't hard in the abstract. The problem is that most guides stop at “upload the CRT file” and skip the parts that cause issues in production: generating the CSR correctly, keeping the private key paired to the right certificate, installing the full chain, forcing HTTPS, and making renewals boring instead of risky.
That's the gap this guide addresses. If you need to install an SSL certificate on Apache, Nginx, or IIS, and you want the setup to stay healthy after launch, this is the workflow that holds up.
Why HTTPS Is Non-Negotiable in 2026
The fastest way to lose trust on a live site is still a browser warning. Users don't parse certificate details. They see Not Secure, hesitate, and leave. That matters whether the page is a login form, a checkout, or a simple contact page collecting names and emails.
HTTPS is no longer the “extra security” layer. It's the baseline for running a public website. As of June 2025, approximately 88.08% of all websites globally use HTTPS, up from 18.5% in 2019, according to Network Solutions' SSL and TLS trends overview. If your site is still on HTTP, you're not operating as an exception. You're operating behind the standard.
That baseline affects more than encryption. It affects how browsers present your site, how teams evaluate technical quality, and how marketing and SEO efforts perform. A secure site won't fix weak content or poor information architecture, but security and discoverability now sit in the same operational bucket. If you're working on content visibility too, these CodeDesign.ai SEO strategies are a good companion read because they connect technical site foundations with search performance.
Trust shows up before content does
When someone lands on a page, the browser UI speaks first. If the connection looks unsafe, the quality of your design and copy barely matters.
Practical rule: Treat HTTPS the same way you treat uptime. Users expect it to already be there.
A missing certificate also creates avoidable friction for teams trying to evaluate site quality. Security issues often show up alongside other trust signals, which is why it helps to periodically check domain trust instead of looking at certificates in isolation.
SSL installation is a business task, not just a server task
Developers often approach this as a config change. Stakeholders experience it differently. They see trust, conversion risk, browser warnings, and brand quality.
That's why the right question isn't “Should we install SSL?” It's “Why is any public environment still missing it?”
Preparing for Your SSL Installation
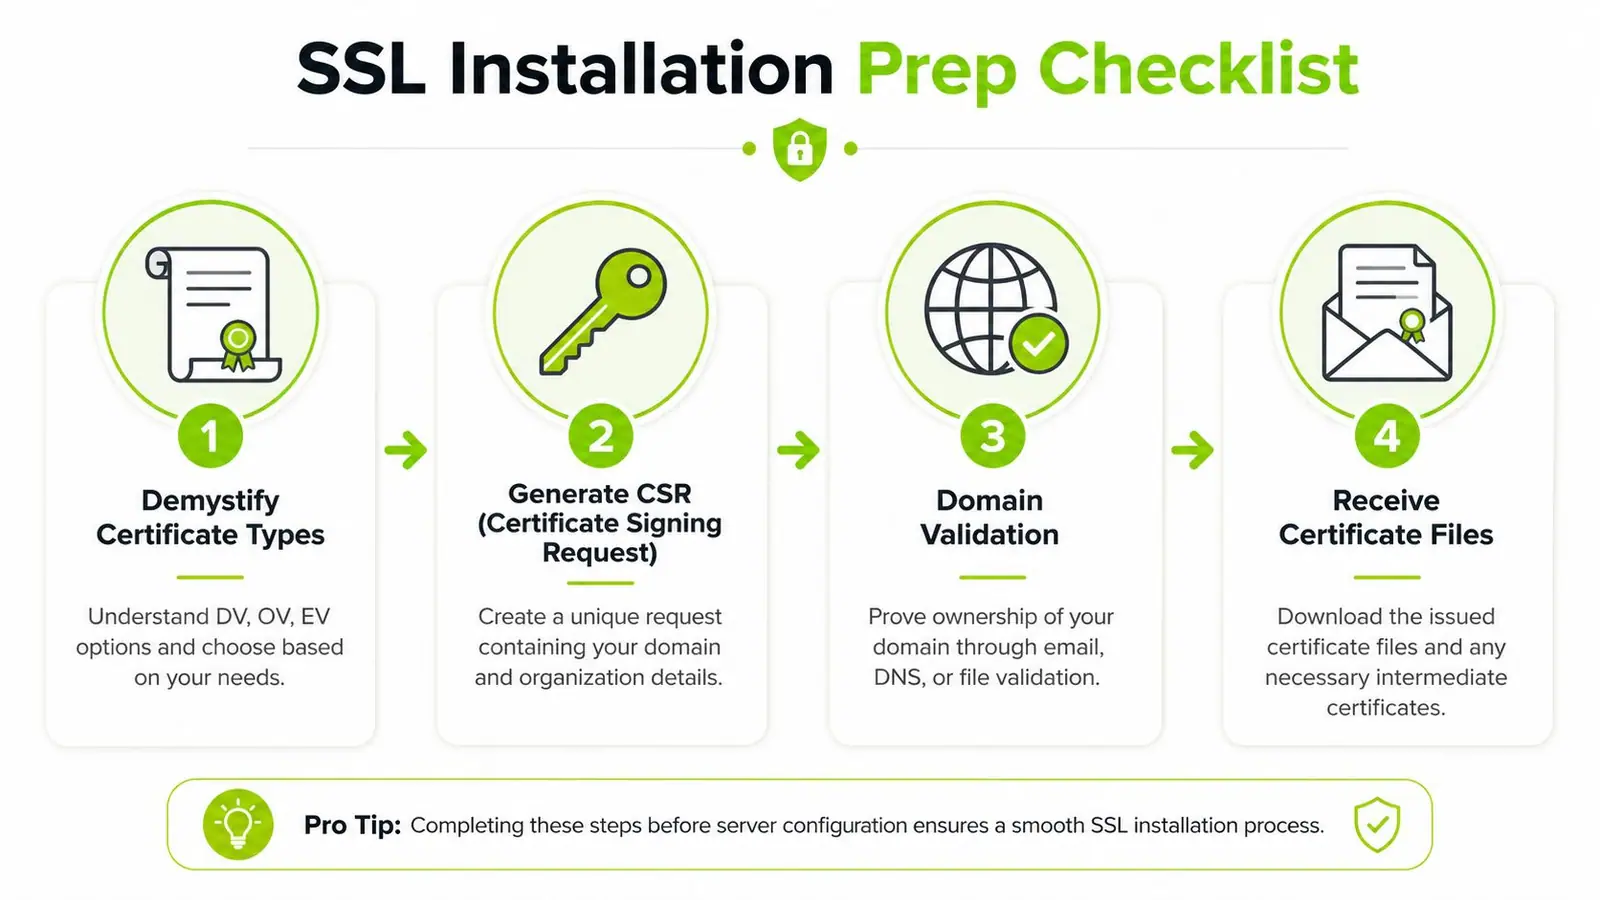
Most SSL failures begin before the certificate file ever touches the server. They start with the wrong certificate type, a sloppy CSR, or a private key that gets lost, overwritten, or mixed up with another environment.
If you want to install an SSL certificate cleanly, preparation matters more than the upload step.
Pick the right certificate type
You'll usually choose from DV, OV, or EV.
- DV certificate works for most sites. The CA validates domain control, not business identity.
- OV certificate adds organization validation. It's more common when the business wants an extra layer of issuer verification.
- EV certificate involves stricter validation and is typically chosen where procurement, legal review, or internal policy requires it.
You also need to choose the scope:
- Single-domain certificate for one hostname
- Wildcard certificate when you need subdomains under one parent domain
- Multi-domain certificate when one certificate must cover several different names
The practical choice is usually simple. For a standard marketing site, app, or admin panel, DV is often enough. For larger organizations with governance requirements, OV or EV may still make sense.
Generate the CSR on the server that will use the key
Improper key generation often causes future trouble. Generate the private key and CSR on the machine or secure workflow that will own the certificate. Don't generate them on one laptop, upload the CSR somewhere else, and then later guess which .key file matched the issued cert.
A typical OpenSSL command looks like this:
openssl req -new -newkey rsa:2048 -nodes -keyout example.com.key -out example.com.csr
That command does two things:
- creates the private key
- creates the CSR
When OpenSSL prompts for fields, pay attention to the important ones:
- Common Name: this must match the domain you're securing
- Organization Name: use the legal business name if your CA requires it
- Organizational Unit: often optional
- Locality, State, Country: use real business details if required by the CA
- Email Address: administrative contact, depending on your process
The Common Name mistake is still one of the easiest ways to trigger a certificate name mismatch later.
Validate the domain with the method that fits your environment
After you submit the CSR to your certificate authority, you'll complete domain validation. DNS validation is usually the cleanest option because it works well across modern hosting setups and doesn't depend on mailbox access or webroot edge cases.
The sequence is straightforward:
- Create CSR locally so the private key stays under your control
- Submit the CSR to the CA
- Complete domain validation
- Download the issued files including any intermediate bundle
That last part matters. A lot of installation problems come from missing intermediate certificates, not from the main certificate itself.
If you're already auditing site infrastructure before launch, it's also worth checking supporting technical assets like crawl paths and XML structure. This quick guide on how to find a sitemap on a website is useful when you're validating a full deployment, not just TLS.
Manual SSL Certificate Installation on Your Server
Manual installation still matters. You'll use it in inherited hosting environments, locked-down enterprise stacks, Windows-heavy shops, and any setup where automation isn't approved or available.
The key thing to understand before touching config files is this: the certificate, private key, and chain must match and be loaded from the correct paths. According to Sucuri's SSL installation lesson, the most frequent pitfall is private key mismanagement. If the private key doesn't match the public key embedded in the issued certificate, the SSL handshake fails with a 100% error rate, and this issue accounts for nearly 28% of failed installation attempts in enterprise environments in that source's reporting (Sucuri Academy).
Put the files in a controlled location
Before editing server config, store the files with clear names and restricted permissions.
A common Linux layout looks like this:
/etc/ssl/private/example.com.key
/etc/ssl/certs/example.com.crt
/etc/ssl/certs/example.com-ca-bundle.crt
Keep the private key readable only by the account that needs it. Don't leave certificate files in a downloads folder, home directory, or shared deployment archive.
Verify that the certificate and key match
This check prevents a lot of wasted time. On Linux, compare the modulus or public key output from both files before reloading the server.
For example:
openssl x509 -noout -modulus -in /etc/ssl/certs/example.com.crt | openssl md5
openssl rsa -noout -modulus -in /etc/ssl/private/example.com.key | openssl md5
If the output differs, stop there. You're holding the wrong pair.
Don't restart Apache or Nginx hoping it will sort itself out. A mismatched key and certificate never becomes a valid handshake by accident.
Apache installation
On Apache 2.4, your SSL vhost often lives in a site config, ssl.conf, or a distribution-specific include file.
A typical VirtualHost block looks like this:
<VirtualHost *:443>
    ServerName example.com
    ServerAlias www.example.com
    DocumentRoot /var/www/example

    SSLEngine on
    SSLCertificateFile /etc/ssl/certs/example.com.crt
    SSLCertificateKeyFile /etc/ssl/private/example.com.key
    SSLCertificateChainFile /etc/ssl/certs/example.com-ca-bundle.crt

    <Directory /var/www/example>
        AllowOverride All
        Require all granted
    </Directory>
</VirtualHost>
What each directive does:
SSLCertificateFilepoints to the primary certificateSSLCertificateKeyFilepoints to the matching private keySSLCertificateChainFilepoints to the intermediate bundle
After saving the file, test the configuration:
apachectl configtest
If Apache returns Syntax OK, reload or restart:
systemctl restart httpd
or on Debian-based systems:
systemctl restart apache2
Nginx installation
Nginx usually keeps site configs in a sites-available and sites-enabled workflow, or directly in an included server block.
A common HTTPS server block looks like this:
server {
    listen 443 ssl http2;
    server_name example.com www.example.com;

    root /var/www/example;
    index index.html index.php;

    ssl_certificate /etc/ssl/certs/example.com-fullchain.crt;
    ssl_certificate_key /etc/ssl/private/example.com.key;
    ssl_trusted_certificate /etc/ssl/certs/example.com-ca-bundle.crt;

    location / {
        try_files $uri $uri/ /index.php?$query_string;
    }
}
Here's the practical distinction:
ssl_certificateshould reference the certificate served to clients, often a full chain filessl_certificate_keymust point to the correct private keyssl_trusted_certificateprovides the trusted chain for validation and related features
Test before reload:
nginx -t
Then apply:
systemctl restart nginx
Windows IIS installation
IIS handles this through the GUI and certificate store rather than plain text config files.
The usual workflow is:
- Open IIS Manager
- Open Server Certificates
- Choose Complete Certificate Request
- Import the issued certificate
- Open the target site
- Choose Bindings
- Add or edit the https binding
- Select the installed certificate from the store
What trips people up in IIS is less about syntax and more about importing the right certificate under the right server context, then binding it to the right site.
SSL configuration directives by Web Server
| Directive Type | Apache 2.4 | Nginx | Windows IIS |
|---|---|---|---|
| Primary certificate | SSLCertificateFile | ssl_certificate | Bound via IIS certificate store |
| Private key | SSLCertificateKeyFile | ssl_certificate_key | Stored with imported cert in Windows store |
| Intermediate chain | SSLCertificateChainFile | ssl_trusted_certificate | Included through certificate import and chain handling |
| Config test | apachectl configtest | nginx -t | Validate binding in IIS Manager |
| Apply changes | systemctl restart httpd or apache2 | systemctl restart nginx | Restart site or IIS service if needed |
What manual setups get right and wrong
Manual installation gives you control. That's useful when you need custom issuance workflows, strict file placement, enterprise approval paths, or nonstandard certificate sources.
It also gives you more opportunities to make small mistakes that are painful to trace later.
- What works well: explicit file paths, documented change control, predictable cert ownership
- What fails often: wrong key file, missing chain, forgotten service restart, unclear renewal ownership
If your environment depends on Linux-based certificate operations, this guide on preventing certificate expiry errors is worth keeping nearby because expiry handling is where manual installs tend to age badly.
Automating Certificate Renewal with Let's Encrypt
For most modern deployments, Let's Encrypt with Certbot is the default answer. It removes purchase friction, simplifies issuance, and makes renewal routine instead of calendar-driven panic.
If I'm deploying a standard Linux web server without unusual compliance constraints, I'll start by asking whether there's any reason not to automate. Usually there isn't.
Why Certbot is the practical default
Certbot handles issuance, installs the certificate into supported server configs, and sets up renewal automation. That matters more now because certificate lifecycles are getting shorter across the industry, so manual renewal processes become harder to defend over time.
A typical Apache flow looks like this:
sudo apt update
sudo apt install certbot python3-certbot-apache
sudo certbot --apache
A typical Nginx flow is similar:
sudo apt update
sudo apt install certbot python3-certbot-nginx
sudo certbot --nginx
Certbot will usually:
- detect eligible virtual hosts
- request the certificate
- update the server configuration
- offer to configure HTTP-to-HTTPS redirection
- install renewal hooks or timers
Test renewal before you trust it
Don't assume automation is working because the first issuance succeeded. Test the renewal path.
Run:
sudo certbot renew --dry-run
If that passes, your renewal workflow is in much better shape. If it fails, you've learned early, while the current certificate is still valid.
A successful first install is only half the job. Renewal is the part that decides whether SSL stays invisible or becomes an outage.
For readers who want a visual walkthrough before trying it on a live host, this video gives a good Certbot-oriented reference point:
When Let's Encrypt is not the best fit
Automation isn't automatically the best production choice for every environment. Some enterprise teams still prefer manually managed CA certificates because they want tighter issuance control, explicit chain handling, internal review, or better compatibility with older systems.
That trade-off is real. As noted in SSL Cert Checker's installation guide discussion, for enterprise-scale deployments, manual CA certificates with explicit intermediate bundles often outperform automated Let's Encrypt in stability and compatibility with legacy clients.
That doesn't make Let's Encrypt weaker. It means the operating context matters.
A simple decision rule
Use Let's Encrypt and Certbot when you have:
- Standard web servers with shell access
- Small to mid-sized deployments where speed and automation matter
- Clear ownership for server operations
- No unusual legacy-client requirements
Choose a manual CA workflow when you have:
- Complex edge setups involving load balancers or layered infrastructure
- Strict procurement or compliance requirements
- Legacy client compatibility concerns
- Centralized certificate governance
If you need to install an SSL certificate once and forget it safely, Certbot is excellent. If you need to govern certificates across constrained enterprise systems, manual control may still win.
Securing Your Site After Installation
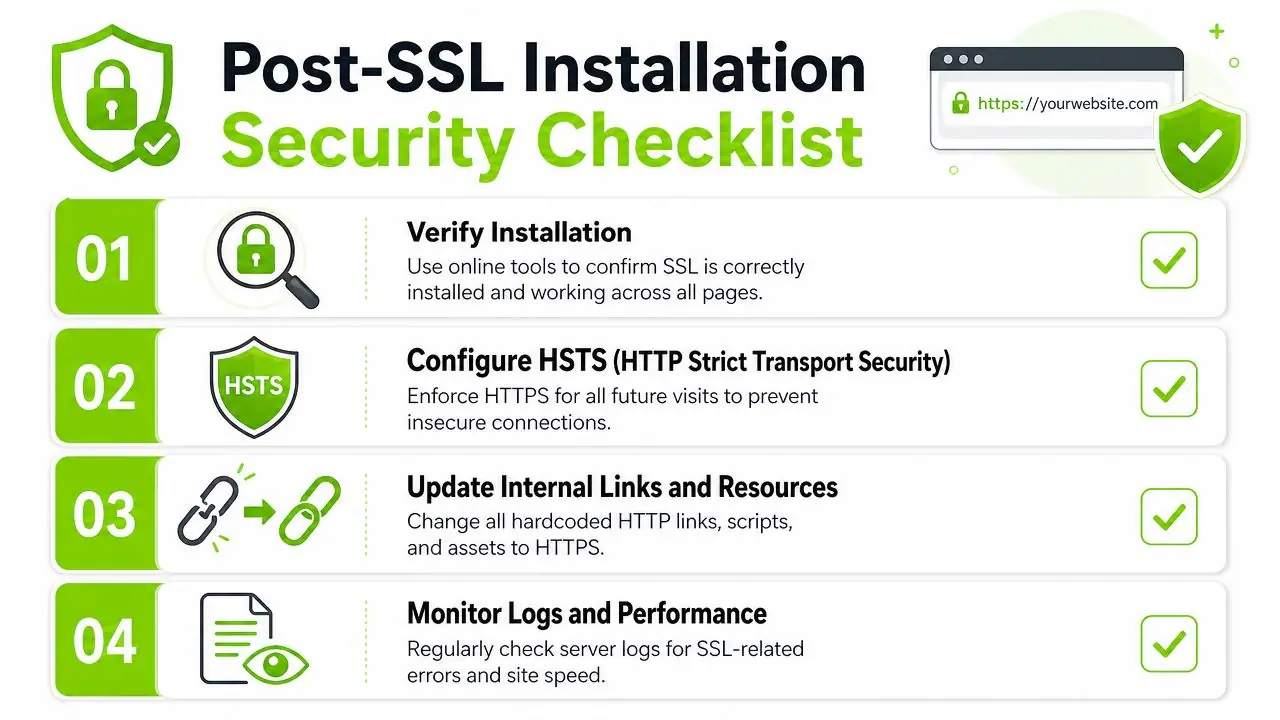
A valid certificate isn't the end state. It's the starting point. Sites still show insecure behavior after successful installation because traffic isn't forced to HTTPS, the chain is incomplete, or pages load assets over HTTP.
That's where the actual hardening begins.
Install the full certificate chain
A correct SSL setup includes more than the main certificate. According to Internet Hosting's SSL installation guide, a proper installation requires a three-tier certificate chain made up of the Root Certificate, Intermediate (CA Bundle), and Primary Domain Certificate, and incomplete chain errors cause 34% of browser security warnings on new deployments.
In practice, that means you shouldn't upload only the domain certificate and call it done. Many clients and devices need the intermediate chain to validate trust correctly.
Force every request onto HTTPS
If users can still hit HTTP, you still have a security gap.
For Apache, a common redirect in .htaccess looks like this:
RewriteEngine On
RewriteCond %{HTTPS} off
RewriteRule ^ https://%{HTTP_HOST}%{REQUEST_URI} [L,R=301]
For Nginx, the HTTP server block can return a permanent redirect:
server {
    listen 80;
    server_name example.com www.example.com;
    return 301 https://$host$request_uri;
}
This does two things. It protects users who type the old URL, and it consolidates traffic on the secure version instead of leaving both protocols active.
Add HSTS and clean up mixed content
HSTS tells the browser to use HTTPS for future requests.
For Apache:
Header always set Strict-Transport-Security "max-age=31536000; includeSubDomains"
For Nginx:
add_header Strict-Transport-Security "max-age=31536000; includeSubDomains" always;
Be careful with HSTS on production domains that include subdomains you don't fully control. Once a browser caches the policy, users won't casually fall back to HTTP.
HSTS is powerful because it removes user choice from the downgrade path. That's exactly why you should enable it deliberately, not casually.
You also need to remove mixed content. Update hardcoded asset URLs in templates, CSS, JavaScript references, CMS settings, and third-party embeds. If even one script or image still loads over HTTP, the browser may degrade trust indicators or block the resource.
When this spills into operational debugging, reviewing access and error patterns helps. This guide on how to analyze log files is useful when you need to trace redirect loops, handshake attempts, or asset-loading issues after an SSL rollout.
Verifying Your SSL Certificate and Configuration
Never stop at “the site loads.” That only proves a browser displayed something. It doesn't prove the chain is correct, the right certificate is served, or renewals and redirects behave the way you expect.
Verification should happen from three angles: external scan, browser inspection, and command-line validation.
Check from outside first
Start with a trusted SSL checker. The goal is to confirm:
- the certificate is presented correctly
- the hostname matches
- the chain is complete
- the server isn't serving an old or unintended cert
This is the fastest way to catch obvious deployment mistakes after you install an SSL certificate on a public host.
Confirm what the browser actually sees
Open the site in Chrome, Edge, Firefox, or Safari and inspect the connection details. Check the certificate subject, issuer, validity window, and whether the browser reports a secure connection without warnings.
Also test several real pages, not just the homepage. Product pages, login screens, blog posts, and asset-heavy templates often expose the problems the root URL hides.
If the homepage looks secure but inner pages don't, you don't have an SSL success story. You have a partial rollout.
Use OpenSSL from the command line
For direct inspection, query the server with OpenSSL:
openssl s_client -connect example.com:443 -servername example.com
This lets you inspect the presented certificate chain and verify the server response without relying on browser UI.
Look for:
- certificate subject and SAN coverage
- issuer chain
- handshake success
- unexpected certificate substitutions
If you're deploying a new site and want to make sure secure pages are also discoverable after launch, it's smart to pair SSL verification with indexing checks. This guide on how to index your website on Google is a good operational follow-up once HTTPS is stable.
Troubleshooting Common SSL Installation Errors
SSL problems usually show up first as browser errors, but the fix is almost always on the server side. Read the error carefully, then work backward from certificate scope, file pairing, chain completeness, and redirect behavior.
Certificate name mismatch
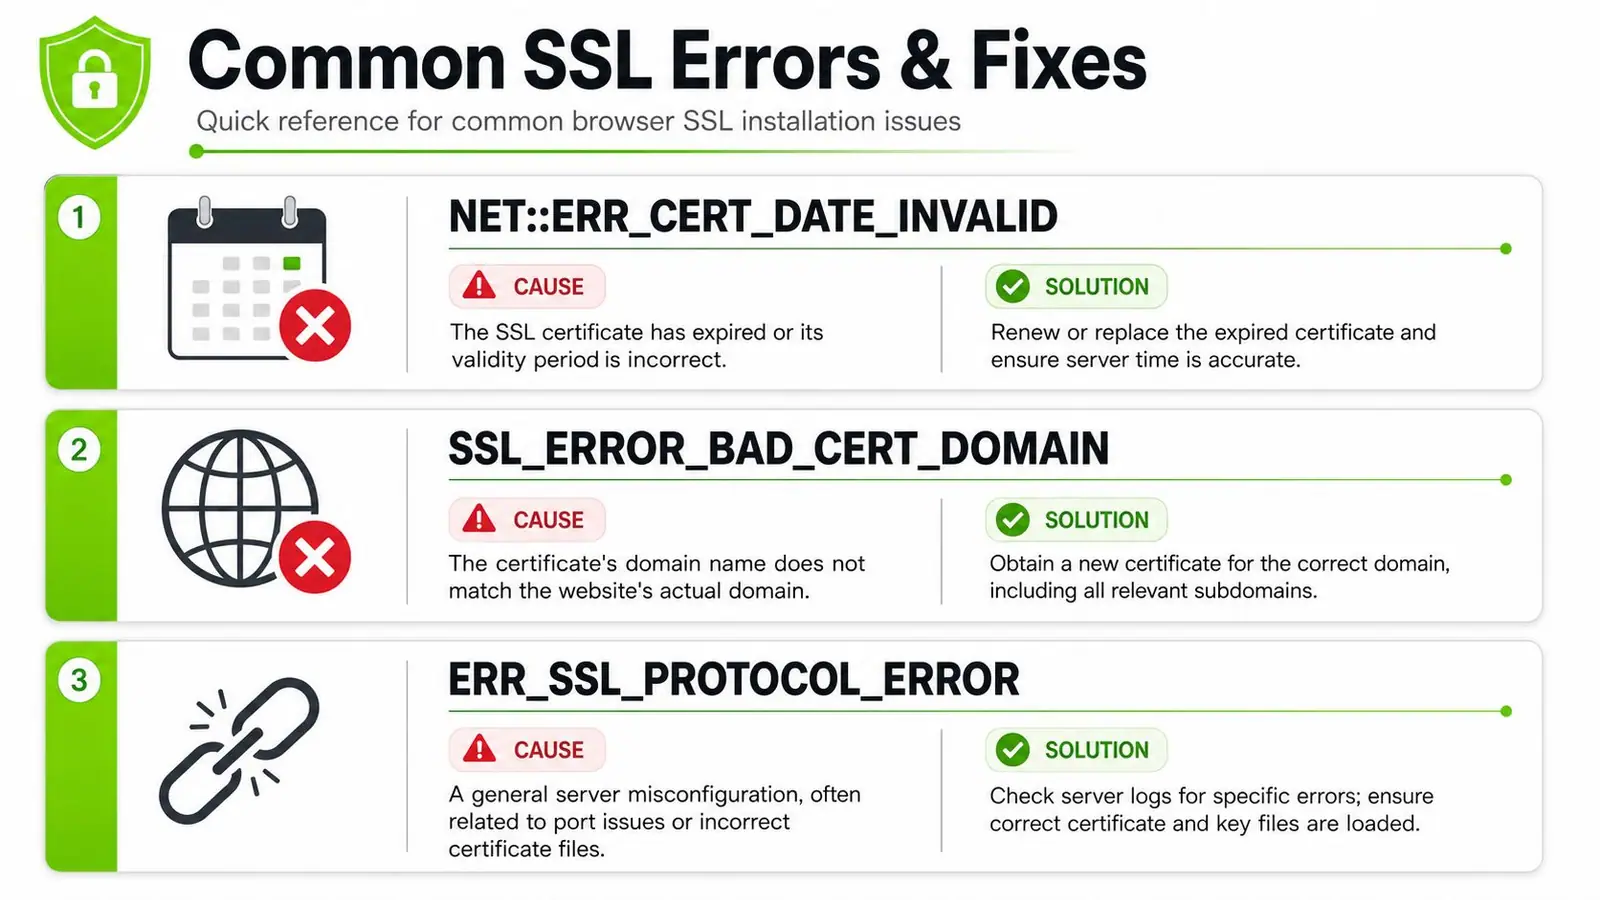
If the browser reports a domain mismatch, the certificate wasn't issued for the hostname users are visiting. Check the Common Name and Subject Alternative Names, then compare them with the exact hostnames served by that site.
This often happens when teams install a certificate for www and forget the apex domain, or the other way around.
ERR_SSL_PROTOCOL_ERROR
This usually points to a bad server-side setup. Common causes include loading the wrong certificate file, binding the wrong key, incomplete TLS config, or a service that never reloaded the new files.
Check the server logs first. Then verify the active config with your server test command before restarting the service again.
Mixed content and partial security
According to Neel Networks' SSL installation guide, many tutorials skip HTTPS redirects and mixed-content testing, and that omission leaves 40% of sites partially insecure despite having a valid certificate installed.
That matches what shows up in real deployments. The certificate is valid, but pages still call old HTTP assets from themes, templates, plugins, or static includes.
Use browser developer tools to find blocked or insecure resources, then update those references to HTTPS or protocol-relative safe equivalents where appropriate.
- Expired certificate warning: renew the certificate, install the renewed files, and confirm the server is serving the new version
- Incomplete chain warning: install the CA bundle or full chain, then retest externally
- Redirect loop: check whether your proxy, application, and web server are all trying to enforce HTTPS in conflicting ways
If your team needs a clearer way to monitor technical SEO, AI visibility, and the kinds of site issues that affect trust and discovery, Surnex gives agencies, in-house teams, and developers one place to track modern search performance without stitching together a pile of separate tools.